Showing posts with label Christmas. Show all posts

Monday, January 2, 2012

Inspiration from 1965


I think I'm pretty late to the game when it comes to Pinterest.  I finally set up my account just a couple of weeks ago, and I have to admit that it can be pretty fun to look at so many beautiful images.  On my first day, I encountered the above picture, and couldn't believe what I was seeing.  I have always admired my mother-in-law's handmade ornaments that currently belong to my sister-in-law.  I had heard that she made them right around the time that my husband was born from a pattern she found in some magazine.  Not only was I looking at a picture from the original magazine, but there was a link attached to give me a little more information.  I was able to find out exactly which magazine the ornament patterns were in, and, best of all, I found the magazine for sale on ebay and purchased it for less than $2!


I couldn't wait for it to arrive, and when it did, I spent a good hour going through every picture and description.  It is a Family Circle publication, titled Christmas Helps 1965.  The pictures throughout look like they come straight out of an episode of Mad Men.


The article that goes along with the above picture is all about how a hostess should act, and etiquette for party goers.  Doesn't she look like Joan?


I love this pine cone tree, and after making my little wreath, I can't imagine the time that went into creating a full-size tree!


When I showed my mother-in-law the magazine, she was especially enamored by the stockings.  Can you imagine having such a variety?


This partridge-in-a-pear-tree is probably my second favorite idea from my vintage magazine!

As much as I love all of the new ideas I see floating around on the Internet, I have to admit my favorite things are always vintage.  I'm already looking forward to Christmas crafting.


-Amy

Tuesday, December 13, 2011

A Couple of Gift Ideas

 So I have been working on finishing homemade gifts like a mad woman.  All of our family lives far away so I have to get everything ready in time to be shipped to their separate destinations.  I wanted to share a couple of the gifts that I have working on as of late.


 The simple Nativity: I wanted to make a simple Nativity this year to give to our family and friends.  I saw this a while back on Pinterest somewhere long before I had my own account set up.  So when I went to go find the same project again it was no where to be found.  So I improvised with what I remembered of someone else's inspiration.  I know that there is someone out there I should be crediting for this simple yet perfect Nativity but, unfortunately I can't find them.

 I wanted to make something that we could put down low for our children to touch and admire with their little fingers and not have to worry about the fragility of a fancier Nativity. I love the simplicity of it but, unmistakably you know who and what it represents.  I attached a quote from this year's Christmas Devotional:


“Of course, we do not need a Christmas holiday or Christmas traditions to remember Jesus Christ, the Savior. … May each Christmas season remind us to lift up our voices and fill our hearts with joy and gratitude that Christ the King has come! Christ lives! He is real. He is our Redeemer at Christmas and always.”
-President Dieter F. Uchtdorf

 I love personalizing gifts.  So, on the side of each Nativity I put the families name of whom we will be giving it to with the year.   I am so happy with how it turned out.  We already have ours displayed down low for our girls to look at.

Would you like to make your own?  This is what you will need:

*6"-2x2 (I did not sand them down before painting. I wanted a rough unfinished look)
*5"-2x2
*1/2" square dowel cut 3" in length
*2x 1-1/2" ball knob (for Mary)
*3x1-1/2" ball knob (for Joseph)
*1x 1/2" furniture button (for baby Jesus)
*desired acrylic paint, gorilla glue, and some twine

I cut the 2x2s for Joseph, and for Mary. I did not sand them down before painting. I wanted a rough unfinished look. I painted them and distressed them topping each with a flesh colored 2and3x-1/2" ball knob and attaching it with Gorilla glue.
For the baby I did the same steps as above.  The only difference being that in order for the ball to attach to the flat piece of wood you have to let the glue dry while it's lying down in order for it to adhere together.

I glued all of the figures together.  I didn't want any of the pieces to get lost so I figured gluing it all together would be a good option.  You definitely don't have to glue them together.  You could just bind them with the twine or leave it loose. 


Scrabble Necklace:  Talking about personalizing gifts I decided to make my girls and their friends Scrabble necklaces.  I sorted through one of 3 Scrabble games and pulled out various pieces to match the initials of their friends.  Little did they know I made one for them too.  I am going to give it to them on Christmas.  I liked them so much I even made one for myself.

I found the colored ball chains and the square bail plates at Hobby Lobby.  I used my E-6000 industrial strength adhesive.  Just a little dab will do on the back of the Scrabble piece to adhere it to the bail plate.  That was it!  Super simple.  It only took about 10 minutes for it to dry completely. 


I found my metal stamps a while back at Harbor Freight Tools for super cheap.  I just saw that Hobby Lobby sells metal stamps also--they even have different fonts.  I  have been a stamping fool lately. 

Well I hope that this gives you a couple gift ideas.  I will post more of my handmade gifts later on this week.
  
-Julia

Monday, December 12, 2011

Deck the Halls


Since Julia took the time to share some of her holiday adornments, I thought I might do the same thing.  It's been a busy, busy season for me.  I just finished up a graduate class I'm taking to renew my counseling license, which didn't leave me much free time to do all the crafting that I like to do.  Now that it is pretty much over, though, I have kicked things into high gear and have been accomplishing things right and left! The wreath, pictured above, is one such thing I finished over the weekend.  If you can stick through the end of this post, I will show you how to make your own.


This corsage was a day of distraction.  A friend asked me to help her make this for her son's date to the Winter Dance.  The challenge was to use things that we already had or could buy in our very, very small town.  Although it was a challenge (I have never made such flowers before), I was able to pull it off.  My friend made a ribbon that slipped through the back that was tied around the girl's wrist.  The nice thing about this corsage is that it can be re-used as a hair piece or a pin.  I would love to make more of these.


While procrastinating working on my final project for my class, I painstakingly made this pinecone wreath for our front door.  The pinecones all came from my grandmother, who is pinecone hunter and collector.  When I asked her if she had any small pinecones she could give me for this project, she went out back and found a 30 pound gunnysack of pinecones.  I was thrilled!  After the holiday, I plan to give this to my grandma to hang year-round if she wants.  The poinsettia is removeable.  Bonus: inside the gunnysack I found some beautiful lime colored moss that I was able to tuck into the cracks.


One of my favorite things to collect is vintage ornaments.  I'm lucky because the thrift store in town often gets boxes and boxes in from estates.  Last year I think I bought 20 boxes of ornaments for 50 cents each, hoping to make a glass ball wreath.  I think I'm too chicken to make one, because surely it will fall and all of my ornaments will break.  Instead, I like to display them in glass containers throughout the house.  I even was brave and put a couple on the tree.


Speaking of my favorite thrift store, I picked up a large frame there this weekend for 10 cents.  I had wanted to make a coffee filter wreath this year (totally unbreakable and totally cheap), gluing the filters onto a large embroidery hoop I thought I had in the closet.  Unfortunately, I could never find the hoop, so I thought I'd try a frame instead.  I can't take any credit for the frame idea, as my friend did it first, on a smaller scale.  If you'd like to make one too, you will need some sort of frame or hoop, a glue gun and an entire package of small, round coffee filters, which cost about a dollar.


Flatten your coffee filter and fold it in half, then fold it in half again.


Put a dab of glue on the outside edge of your frame and put your folded filter on it, with the folded edge of the filter pointing down.

Continue to glue on filters, each one about a 1/2 inch down from the next, until you go all the way around your frame.


Next, go around the top, front part of your frame, pointing the filters in the opposite direction.  Remember to keep the folded edge of your filter towards the bottom.


Finally, go around the inside edge of the frame, again in the opposite direction.  Make sure that the your filters go up and not towards the back.  Otherwise, they won't sit flush against the wall.  When it is done, spend a little time fluffing your filters.


I hung mine on my hallway closet door.  If you look closely, you can see that I attached a little sign that says "Happy New Year!"  Remember when I said that I like to leave decorations up as long as possible?  This project was cheap and simple.  If I had any advice, I would say to separate, flatten and fold all of your filters before you want to start your project.  That was the most time consuming part, and if I would have thought of doing it ahead of time, I could have just done it all while watching a movie or something.

I think I've done enough decorating projects.  It's time to start cracking on my gift making.  Next time I post, I'll share with you some simple gift ideas to give your friends and family.


-Amy

Friday, December 9, 2011

Christmas Around my House and Giveaway Winner

 My front door wreath.  Does it look familiar.  Same style as the one I made for the fall.  I might be addicted to these wreaths!

I change up our Christmas card display every year.  This year it is a simply wire with clothes pins in our dining room.  During dinner we love to look at all of our friends and families pictures and talk about how much we miss them.  

My Santa display.  My mother bought me one Santa a year when I first got married.  They are really detailed and beautiful.  I love them!  Thanks mom! On the mantel is also a bell from Cameron's grandpa.  He collected bells and would display them every year.  I love that we have that piece of heritage in our house.

My favorite Nativity.  My mom bought this for me in my early years of marriage.  I love how simple it is.  I was heart broken when the donkey had a run in with my toddler.  Nothing a little Gorilla glue can't fix right?

My favorite Christmas print is this one.  I love how the artist portrayed such a tender moment between Jesus and Mary.  When ever I pass it I always stop and think about what it must of been like to be Mary--the mother of our Savior.

My smallest Christmas treasure is this nativity.  It is smaller than my palm and I love it.  I bought while I was serving a mission in Argentina.  It was handmade there and I will always treasure it.

 My favorite handmade decoration is this stocking.  My grandma made this for me when I was little and I have treasured it ever since.  I hang it every year.


 So this is my house--what do just love to decorate with at your house? I would love for you to share a link to your blog with photos of your Christmas treasures.


Now for the Fall Frock Giveaway!  
Thank you all for entering I wish I had one for all of your little girls!
  (I haven't quite figured out how to post the picture of the random integer program.  You can go to the link to see. )
And the winner is #4
kim g said...
Me, me!! I would love a Fall Frock for Grace! :)  **Kim e-mail us with your address. So I can send this off to you ASAP!**
We are going to have many giveaways on this blog so stay tuned for your chance to win!
 -Julia

Tuesday, November 29, 2011

Felt Bird Ornament (Finishing Up)


We're almost to our finished ornament!  Our next step is to cut out the body of the bird and attach our wing.


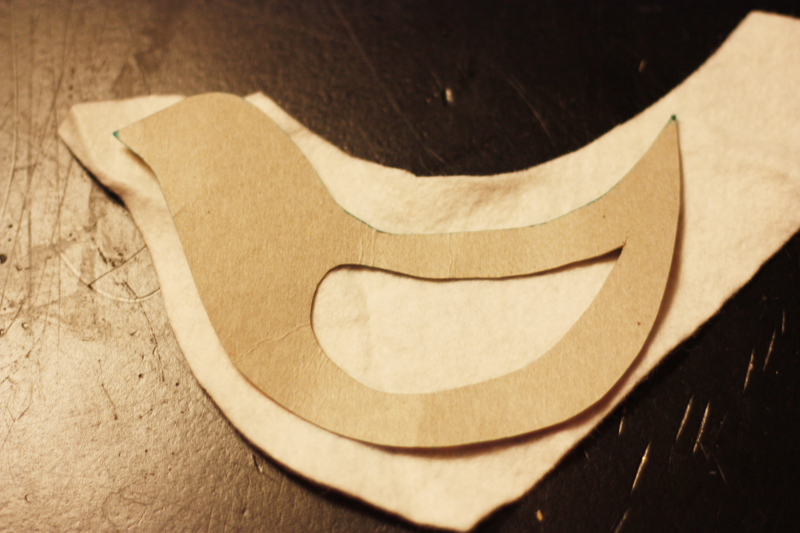
Trace your stencil onto your contrast color of felt.


And then trace onto your white or cream felt.


Cut them both out.  If you like to use pinking sheers, don't bother tracing the contrast and just place your white felt on top of the contrast (be smart, and pin -- don't follow my example) and then cut out your shape.  This way your cutting will match up.


Pin your wing to the front of the bird and then stitch a black french knot for the eye.  Only stitch through the front side for the eye and the wing (I took this picture holding the back on).


Using a color thread of your choice, stitch around the wing to attach it.


Here is a view of the backside.


The next step is to attach the contrast felt to the front of the bird.  Stitch around the edges and then leave an opening to stuff in a little stuffing.  My bird looks like he has some fuzz coming out of his bottom.  When your bird is lightly stuffed (I prefer just a small amount), finish stitching him up.


Sew a string to the top so that it can hang.  You will have to play around with the placement of your string, as the bird's center of gravity is not in the middle, but more towards his head.


You're done!  Now that you are felt embroidery experts, you might want to try a few more Christmas ornaments.


                    A Grumpy Bear and a Christmas Ball.


Your child's hand.  I actually made several of these for my kids, friends' kids and my nephew.  Have fun with your new skill!

Tuesday, November 22, 2011

Felt Bird Ornament (Wings First)


The first thing you are going to need to do is make your stencil.  I hand drew mine on the thin cardboard of cereal box.  You can use a google image for inspiration or just free-hand it.  You then want to draw a wing in the middle of the bird.  Cut along the outside of the bird, and then cut out the wing.


For this project, and most other embroidery project, I rely on my trusty water-soluble sewing pen to draw my outlines.  Don't mind the cap that is missing from the purple ink side (I think the kids got to it).  I never use that end, anyway, as it always seems to disappear before I am finished with my project.  The blue ink will rinse away with water very easily after you are done stitching.  Sometimes I will just wipe it with a damp washcloth to remove the ink.


Pull out your wool felt.  You could really do any color.  I just like white or cream.  A red one would be really pretty.  Trace your wing onto your felt -- I like to do several at a time.  I am able to fit three wings on this 6"x6" square.


Then draw your design motif inside your wing.  This will be your pattern to follow.  It is difficult to see my pen markings (and my felt isn't really brownish, but I increased the contrast to make the lines stand out a bit more), so I drew some out on a piece of paper so you could get some ideas.


This is your chance to be creative.  Anything goes!  The holly and berries on the second leaf down is a pattern that I never draw ahead of time.  You'll see how I do it in a bit.


Start stitching.  I started with the straight stitch (or backstitch) to do the scroll.


I also realized that I had never shown you how to tie off when you run out of thread.  I tuck my needle under a thread in the back and then split the leftover string in half and then tie a knot, twice.  Clip your thread down to the knot.


For the scroll pattern I then stitch an outline around the wing using a raised or split stitch.


Here is my second one.  I am going to do french knots in groups of three to make little holly berries.


Then I will use my petal stitch to make leaves to either side of the berries.


Using pinking shears (you can use regular scissors, but I really like how pinking shears make it look), cut out your wings.  You are now ready to attach your wing to the bird.

In a couple days I will show you the next step.  Please let me know in the comments if I have left anything out or if you have any questions.