Pages
▼
Tuesday, November 22, 2011
Felt Bird Ornament (Wings First)
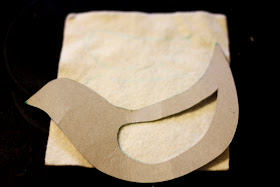
The first thing you are going to need to do is make your stencil. I hand drew mine on the thin cardboard of cereal box. You can use a google image for inspiration or just free-hand it. You then want to draw a wing in the middle of the bird. Cut along the outside of the bird, and then cut out the wing.
For this project, and most other embroidery project, I rely on my trusty water-soluble sewing pen to draw my outlines. Don't mind the cap that is missing from the purple ink side (I think the kids got to it). I never use that end, anyway, as it always seems to disappear before I am finished with my project. The blue ink will rinse away with water very easily after you are done stitching. Sometimes I will just wipe it with a damp washcloth to remove the ink.
Pull out your wool felt. You could really do any color. I just like white or cream. A red one would be really pretty. Trace your wing onto your felt -- I like to do several at a time. I am able to fit three wings on this 6"x6" square.
Then draw your design motif inside your wing. This will be your pattern to follow. It is difficult to see my pen markings (and my felt isn't really brownish, but I increased the contrast to make the lines stand out a bit more), so I drew some out on a piece of paper so you could get some ideas.
This is your chance to be creative. Anything goes! The holly and berries on the second leaf down is a pattern that I never draw ahead of time. You'll see how I do it in a bit.
Start stitching. I started with the straight stitch (or backstitch) to do the scroll.
I also realized that I had never shown you how to tie off when you run out of thread. I tuck my needle under a thread in the back and then split the leftover string in half and then tie a knot, twice. Clip your thread down to the knot.
For the scroll pattern I then stitch an outline around the wing using a raised or split stitch.
Here is my second one. I am going to do french knots in groups of three to make little holly berries.
Then I will use my petal stitch to make leaves to either side of the berries.
Using pinking shears (you can use regular scissors, but I really like how pinking shears make it look), cut out your wings. You are now ready to attach your wing to the bird.
In a couple days I will show you the next step. Please let me know in the comments if I have left anything out or if you have any questions.


Amy, so, so pretty! I still can't get the knot. I guess you need to fly to AL and teach me. So gad your doing this blog!
ReplyDelete