Showing posts with label tutorial. Show all posts

Monday, January 30, 2012

Twisty "Lollipop" Flower

 I have made many many many headbands.  This is one of my girls favorites.  They call them lollipop flowers. They add such a fun pop of color to any outfit.  I thought I would show you how to make them today.

 Supplies:  Strip of fabric-mine was 1/2 an inch, felt, glue, and scissors.


First you want to make a knot at the end of your strip of fabric.  You can make it as thick or thin as you want.  The thicker the strip of fabric the fuller your flower will look.  Next hot glue the know to the center of your felt circle.  Next you will want to twist your fabric like shown above.  Twist around the center knot adding a drop of glue to secure the fabric.


 Continue twisting and winding the strip of fabric until you reach the desired size for your your flower.  Make sure the end is glued securely to the felt.  Then trim off any excess felt so that there isn't any felt exposed.
Then hot glue it to a headband, clip, elastic like demonstrated on Amy's previous post.  You could even use these on a broach or pin. 
Aren't these cute?

I made this one out of tulle to match my daughter's Sunday dress.  I would recommend experimenting with different textures and types of fabric.   You might be surprised how beautiful they turn out.

 -Julia


Wednesday, January 25, 2012

Fun Scrappy Dress

 I have to start off by saying this was one of the 
funnest projects I have done in a while.  
I wish that I came up with this clever idea but, 
alas I am short of original ideas as I spend too many hours up at night with a sick kids.  
I was searching online to find projects to re-purpose and up-cycle clothes and I stumbled upon this awesome dress from :
 She was recently featured on Martha Stewart demonstrating how to contruct this dress.
Cheri shares quite a few re-purposing projects that you should go check out. 

Here are a few photos of my steps in re-creating the dress: 


 All of the girls were fighting over who got the dress.  So, it looks like I will be making more.  

 
 First gather all of your old t-shirts.  

 Pick a decent shirt for the top.  This works great with ones that have holes, snags, or stains on the bottom.

 Start stacking up the layers.  Play around with different colors and patterns.  This was the fun part.  I am pretty conservative with color and pattern mixing.  This was my chance to mix and match.:)  

 After you decide what shirts you are going to use, cut the top piece to fit under the breast. 
For a size 5T-6 dress I cut all of the additional strips 4" wide.  Keep the width the size of the t-shirts.  You will trim those up later.  Cheri gives a great tip: make your bottom piece the hem of one of your t-shirts so you don't have to hem it up later.  I love short cuts!

Here comes the fun part.  I have never painted fabric before.  I had some fabric paint collecting dust so a great chance to pull it out.  I used some foam stamps for stamping.  They worked great!  I have always been afraid that painting fabric had to look perfect but, I realized that if it looks faded it actually looks really cool and vintage.  I wanted that look for this project.  So, it worked great.

 I would recommend putting a piece of cardboard between the layers so it doesn't bleed through.

 Hanging to dry.  It took a couple of hours for it all to dry.

 Sew all of your strips together and trim off the excess.  
Line up the sewn dress strips to the top piece and trim down the sides.  Angle the cut out so they have room to walk and stretch the bottom.  Since I don't have a photo of this step check out 
Sew the front and the back pieces together.  Then attach the bottom skirt to the top shirt piece.  
Then sew it together.  That is it!


I love how it turned out.  So fun and cute.  I love the freedom of painting your fabric.  It adds a unique look and my girls loved it! Ava all ready for school.  She couldn't wait to put it on this morning.

Such a fun and funky dress.  I am so glad for the great ideas that come from blog land to save me from my recent creative block.

I would encourage all of you to try this project. 
You could make a shorter version for a boy that would make a cool funky t-shirt. 
I had a lot of fun with this one--I hope you do too!


 -Julia

Tuesday, January 17, 2012

Pom Pom Scarf


I think in my last post I mentioned that I watch Bones.  In the last year, I have caught myself up to the current season by watching (and skimming) the previous episodes on Netflix.  I have found it is the perfect show to craft during, because you really don't need to pay a lot of attention, and the good parts are usually at the very end of the episode.  It was an episode in season six where I spied a pink pom pom scarf on Angela, and I coveted it and knew I had to have one.  After that, I started noticing poms everywhere, and thought I better get sewing quick!


This definitely a Spring scarf, airy and light, but could be worn as an accessory indoors during any season.  I made mine out of some leftover linen, but you could make yours out of any lightweight fabric.  A striped seersucker would especially cute.  To make one like mine you will need two rectangles of fabric, measuring 52 x 10 inches.  You will also need nearly 4 yards of small pom poms.


Start out by attaching the poms to one rectangle of fabric.  I used a zig-zag stitch to adhere it in place, with the tape on the outside edge, and the poms towards the inside of the fabric.


Pin the two rectangles together, with the poms on the inside.  Leave one short end open.  Then stitch the scarf with a 5/8 inch seam allowance along three sides, like a pillowcase.  Turn the scarf right side out (poking out the corners), fold in the open end and pin, and then topstitch the entire scarf.


Then SMILE so your husband can take your picture -- my favorite thing in the world!

Look how happy I am!  I think I'll be wearing this pretty much everywhere.


-Amy

Friday, January 13, 2012

Nest Ring Tutorial


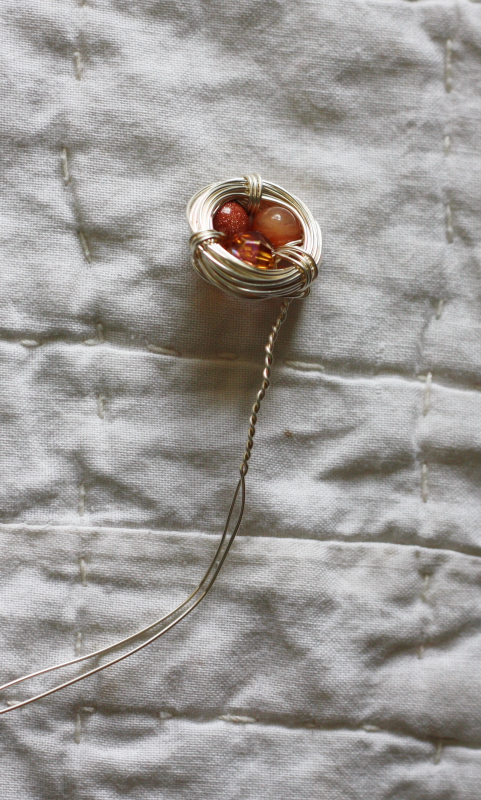
I should start off by saying that I am not a jewelry maker.  I happen to own a couple jewelry tools and some random beads because long ago I thought I wanted to be a jewelry maker.  I think I have made one pair of earrings in my life.  I also know all things bird are a tad overdone, but can't really help myself.  And if you've ever seen Portlandia, you can see the humor in my situation.  What can I say?  I love birds, nests, eggs and feathers with all of my heart.  I'm a complete cliche.  About a year ago I started seeing nest pendants in etsy shops and thought they were so beautiful.  One night, while working my way through a season of Bones on Netflix, I found my bag of jewelry tools and beads and thought that I might try to make my own nest.  But I didn't want a necklace pendant (I already have a lot of necklaces), I thought maybe I could make a ring.  Turns out, I can, and so can you!


You will need: 24 gauge jewelry wire, wire cutters, and three roundish beads that you like.


Put your three beads onto the wire, leaving about 8-10 inches of a leader.  Measure out about a yard of additional wire and cut.


Twist the wires together.


And then weave the short end in and out of the wires that hold the beads.


Then start wrapping the long end of the wire around the edge of the beads, making your nest.  Wrapping it around your finger and then pushing the looped wire down around the beads works also.  Experiment with it.  The wire is very forgiving.


When you have about a foot of wire left, begin to attach the nest to the eggs by looping the wire through the original wires that hold the beads and the nest loop.  Do this in three spots, evenly spaced around the nest.  After you have done this, push any extra wire underneath and through the back of the ring, securing it further.  Snip the end of the wire, if necessary.


Here you can see a picture of the back of the ring.  There are many wires squirming around.  Snip another length of wire, about 12 inches long, and run it through the side of the nest on the back.  I did it where the securing loops are.  Fold the wire in half and then twist the wire to fix in place (like we did in the beginning, when securing the beads).


Continue to twist and twist the wire until it is as long as you need it to be to fit on your finger.


Loop the ends of the wire to the underside of the ring on the other side.  Twist the wires to secure and then tuck the remaining wires into the back of the ring, twisting and pulling it through, so that it won't come loose.  Snip the wire, if necessary.


No, this isn't a toe ring, I just happen to have very stumpy, pudgy fingers.  I've worn these all week and have received many compliments.  This would make an awesome Valentine's gift for a friend (or a sister).  Have fun with this simple project!


-Amy

Wednesday, December 28, 2011

Headband and Bow Organizer

Five girls (including me)= A LOT of hair things.


Do any of you have a drawer like this full of headbands and other various hair things?  Well each of my girls has one.  It stresses me out every time I open the drawer.  I have tried many different types of organizational things but, they all end up back in this drawer.   A while back I came up with an idea that has helped us solve both our headband and clip dilemma.


 I have an old shutter obsession.  I have collected few over the years and have used them for various things around my house.  I realized one day that I could put my shutters to use with our hair things.  

The slats are PERFECT for displaying and holding headbands all I needed to do was add something at the bottom to display hair clips and bows.


Would you like to learn how you can make your own????
First you need to find some wood shutters.  My husband and I have found them at the Habitat Re-store.  I bought this shutter for $1 last month. 

So here is where I will strongly encourage you to check out your local Re-store before doing ANY home improvement projects.  You will find so many deals it will blow your mind!  If your local one doesn't have anything useful check out any neighboring towns to see if they have anything you would need.  We always stop at the Re-store when we travel.  We have saved hundreds of dollars on paint, light fixtures, wood, old windows, furniture, knobs, doors, drywall, insulation, solid oak molding, chairs---you name it we have found it there!  You just might have to look around a bit.
 Okay there I am off my soap box.:)

Now back to the project:
 Now after you have your shutters you are most likely going to have to scrub them up.  You will have to scrub them a lot.  I actually ended up taking mine inside to finish scrubbing with some hot water and a wire scrub brush.

  Then cut off 14" off of each end of the shutter.

 Here is what they looked like after cutting them.  I didn't sand them at this point because I planned to sand them after I painted. 

 Now pick your spray paint colors.  I did 3 different colors for our different rooms. I have spray painted a lot over the years.  I have a preference of spray paint and that is Valspar which you can find at Lowes.  It is a little more expensive but, it sprays on so nicely and I have to apply fewer coats.  Krylon is also a nice brand but, in my experience I always have to apply an extra coat compared to Valspar.  
For this project I did a total of 3 layers of paint (4 with the Krylon brand).  Always allow each layer of paint to dry before applying another coat.
 
Here they are after my paint was done drying.

 Now on to sanding.  I like to rough up my paint a bit.  I don't have a certain technique that I use.  I just sand by hand until I get the look and the texture I want for each project. Since the base of the shutters is black I just sanded lightly until I reached that layer.  I wanted the black to pop through.  Definitely sand until you get the look you want.
 A closer look at my sanding.

 Then I picked my ribbon color.  I used a 7/8" thick grosgrain ribbon.  I would recommend using a sturdy ribbon so it can hold all of your bows and clips.

I cut 5 pieces of  ribbon to be 14" long.  I wanted to end up with about a foot of hanging ribbon.  I then singed or sealed the end of the ribbon by burning the tip of it with a lighter.  Then I thread it through the bottom slat.
 Then apply your adhesive-I used hot glue.  After applying the glue press the glue side to the under side of the long piece of ribbon.  Repeat that 5 times or as many ribbons you have to attach.
 Then I threaded a large yarn needle with the grosgrain ribbon.  This will be used to thread through the top holes of the shutter.   My shutters already had holes drilled in the top and the bottom so it made it easy thread the ribbon through.  The ribbon on top will be used to hang your shutter once you are done.  So measure your desired length---mine was about a foot long (I trimmed a little off once I got it on my wall so it didn't hang so low).  Make sure you tie knots to secure the ribbon like pictured below.

 There you have it!  Doesn't that look nice and organized?  I love how it displays everything in plain sight--easy to find.

Now as I give my sigh of relief that all our hair things are nicely and neatly organized I  realize I space for a few more headbands.  I think I will get to making a few more for my girly girls....

-Julia